AWS update AMI using systems manager automation
Overview :
Having am AMI(Amazon Machine Image) of the most stable production server is a very common practice. On top of that adding maintenance scripts, installing new softwares or patching hotfixes are some of the common actions we need to perform on AMI.
The general flow in simple terms is :
- Take an existing AMI(Let's call it AMI-V1)
- Launch an instance originating from the AMI-V1
- SSH into the new instance
- Run maintenance or installation commands
- Create a new AMI(Let's call it AMI-V2)
- Terminate the tempararily launched instance
- Optionally if you have autoscaling group launch configurations, then update it's association with new AMI-V2
If you do all above steps manually, there is nothing wrong in it. However, AWS has a service called Systems Manager which has a sub-service automation. It can help you to automate and also optionally schedule these AMI updates automatically. Trust me! If you know how to do it once, you will never go back to manual updates.
How it works :
SSM's automation service has different types. Those are called Executions. When you add details on what and how to setup that execution, the entire thing is called Execution Document. Dont worry, it's not that important to remember these names as long as you know how to use it.
There are many different types of executions available in automation service. One which we are looking for is called AWS-UpdateLinuxAmi. This execution helps us to automate updates to AMI with Linux distribution packages and Amazon software.
When you create the execution to automate the AMI updates, you can specify which AMI to update, specify the script of commands to run and specify the new AMI name. There are more steps to it which we will cover in Implementation section down below.
Prerequisites and difficult terms explained :
Before starting actual implementation, let's take a minute to understand few terms which are little tricky. I am very sure if any of you have dived into SSM automation for first time, you came across these and felt little overwhelmed.
When you set up the AWS-UpdateLinuxAmi automation, the form in AWS console asks you to give certain parameters(details of the setup)
The 2 parameters IamInstanceProfileName and AutomationAssumeRole are tricky to understand.
- IamInstanceProfileName :
It's also referred as ManagedInstanceProfile. When AWS SSM runs the automation execution AWS-UpdateLinuxAmi, SSM needs to take certain actions in EC2 service. These are launching an instance from an existing source AMI, creating a new AMI from updated instance state and terminating the temparary instance etc.
For this purpose you create a new IAM Role (Identity Access Manamegement Role). The IamInstanceProfileName is nothing but the name of this created IAM Role.
- AutomationServiceRole :
When SSM runs the automation execution AWS-UpdateLinuxAmi, SSM needs to assume the IAM role which we created for IamInstanceProfileName above, pass it as allowed so that it can function with the respective policies it's attached with.
For this purpose you create second a new IAM Role (Identity Access Manamegement Role). The AutomationServiceRole is nothing but the arn(Amazon Resource Name) of this created IAM Role.
- Trust Relationships :
When you create both these roles mentioned above(We will dived in detail below), we need to update their Trust Relationships. With IAM roles, you can establish mutual trust relationships between your trusting account. In short, the trusting account owns the resource to be accessed and the trusted account contains the users who need access to the resource.
Creating required IAM roles :
Step 1 : Create IAM Role for IamInstanceProfileName :
- Login to AWS console and go to `IAM` service.
- Go to Roles listing and click on `Create Role`
- Keep type selected as `AWS Service`
- Below in `Choose the service that will use this role` section select `EC2`
- Click on `Next : Permissions` button on bottom right
- It will bring the page to attach permission policies
- Select `AmazonEC2RoleforSSM` policy
- Click on `Next : Tags` button on bottom right
- Add tags if you want or skip to next step by clicking `Next : Review` button on bottom right
- It will bring page to add role details
- Add a `Role name` as `ManagedInstanceProfileForSSM`
- Click on `Create Role`
Step 2 : Create IAM Role for AutomationServiceRole :
- Login to AWS console and go to `IAM` service.
- Go to Roles listing and click on `Create Role`
- Keep type selected as `AWS Service`
- Below in `Choose the service that will use this role` section select `EC2`
- Click on `Next : Permissions` button on bottom right
- It will bring the page to attach permission policies
- Select `AmazonSSMAutomationRole` policy
- Click on `Next : Tags` button on bottom right
- Add tags if you want or skip to next step by clicking `Next : Review` button on bottom right
- It will bring page to add role details
- Add a `Role name` as `AutomationServiceRole`
- Click on `Create Role`
Step 3 : Get the arn string of ManagedInstanceProfileForSSM :
We need to associate the first cerated IAM role IamInstanceProfileName to pass in this role.
- Go to Roles listing and select `ManagedInstanceProfileForSSM`
- It will show the details of this role
- Copy the `arn` of this role
- The arn will be in a format `arn:aws:iam::{IAM_USER_ID}:role/ManagedInstanceProfileForSSM`
- Keep this arn string somewhere as we will need it in next steps
Step 4 : Create policy to pass the above arn into second role :
- Login to AWS console and go to `IAM` service.
- Go to `Policies` listing and click on `Create Ppolicy`
- It will show you visual editor and JSON tabs
- Click on `JSON` tab and paste following policy json
{
    "Version": "2012-10-17",
    "Statement": [
        {
            "Sid": "VisualEditor0",
            "Effect": "Allow",
            "Action": "iam:PassRole",
            "Resource": "arn:aws:iam::{IAM_USER_ID}:role/ManagedInstanceProfileForSSM"
        }
    ]
}
- Make sure you replace the resource arn in this policy json with the one you copied just few steps back
- Click on `Review Policy` button on bottom right
- Give policy name as `PassPolicyForIamInstanceProfileRole` and create the policy
Step 5 : Attach policy to pass the above arn into second role :
- Login to AWS console and go to `IAM` service.
- Go to Roles listing and select `AutomationServiceRole`
- Click on `Attach Policies` and attach `PassPolicyForIamInstanceProfileRole` policy
Step 5 : Update trust relationships :
- Login to AWS console and go to `IAM` service.
- Go to Roles listing and select `ManagedInstanceProfileForSSM`
- Go go `Trust Relationships` tab and click on `Edit trust relationship`
- Add following json and click on `Update trust relationship` in bottom right
{
    "Version": "2012-10-17",
    "Statement": [
        {
        "Effect": "Allow",
        "Principal": {
            "Service": [
            "ec2.amazonaws.com",
            "ssm.amazonaws.com"
            ]
        },
        "Action": "sts:AssumeRole"
        }
    ]
}
Hush!! Now the confusing part is DONE! We have few lats simple steps to complete.
Creating script of commands to run :
We need to create a script of commands which will run on the instance. This script needs to be stored on web and we just pass url of this script while configuring the automation execution.
For this, we will simply create an s3 bucket and store file in there instead.
- Login to AWS console and go to `S3` service.
- Click on `Create Bucket`
- Give bucket a name and click on `Create`
- Create a script file on your local machine with name `ssm-automation.sh` and add below contents in it
#!/bin/bash

# This script installs latex on the instance
# Feel free to change this as per your needs
sudo apt-get update
sudo apt-get install texlive-latex-base -y --allow-unauthenticated
- Now upload this script file from your local machine to the new s3 bucket
- Once upload is completed, click on the file and click on `Make Public` so that it's publically accessible
- Copy its public url and save it somewhere as we will need it in next step
The moment you have been waiting for :
Now its time to set up the final automation execution.
- Login to AWS console and go to `Systems Manager` service.
- Click on `Automation`
- Click on `Execute Automation`
- Choose document page select `AWS-UpdateLinuxAmi`
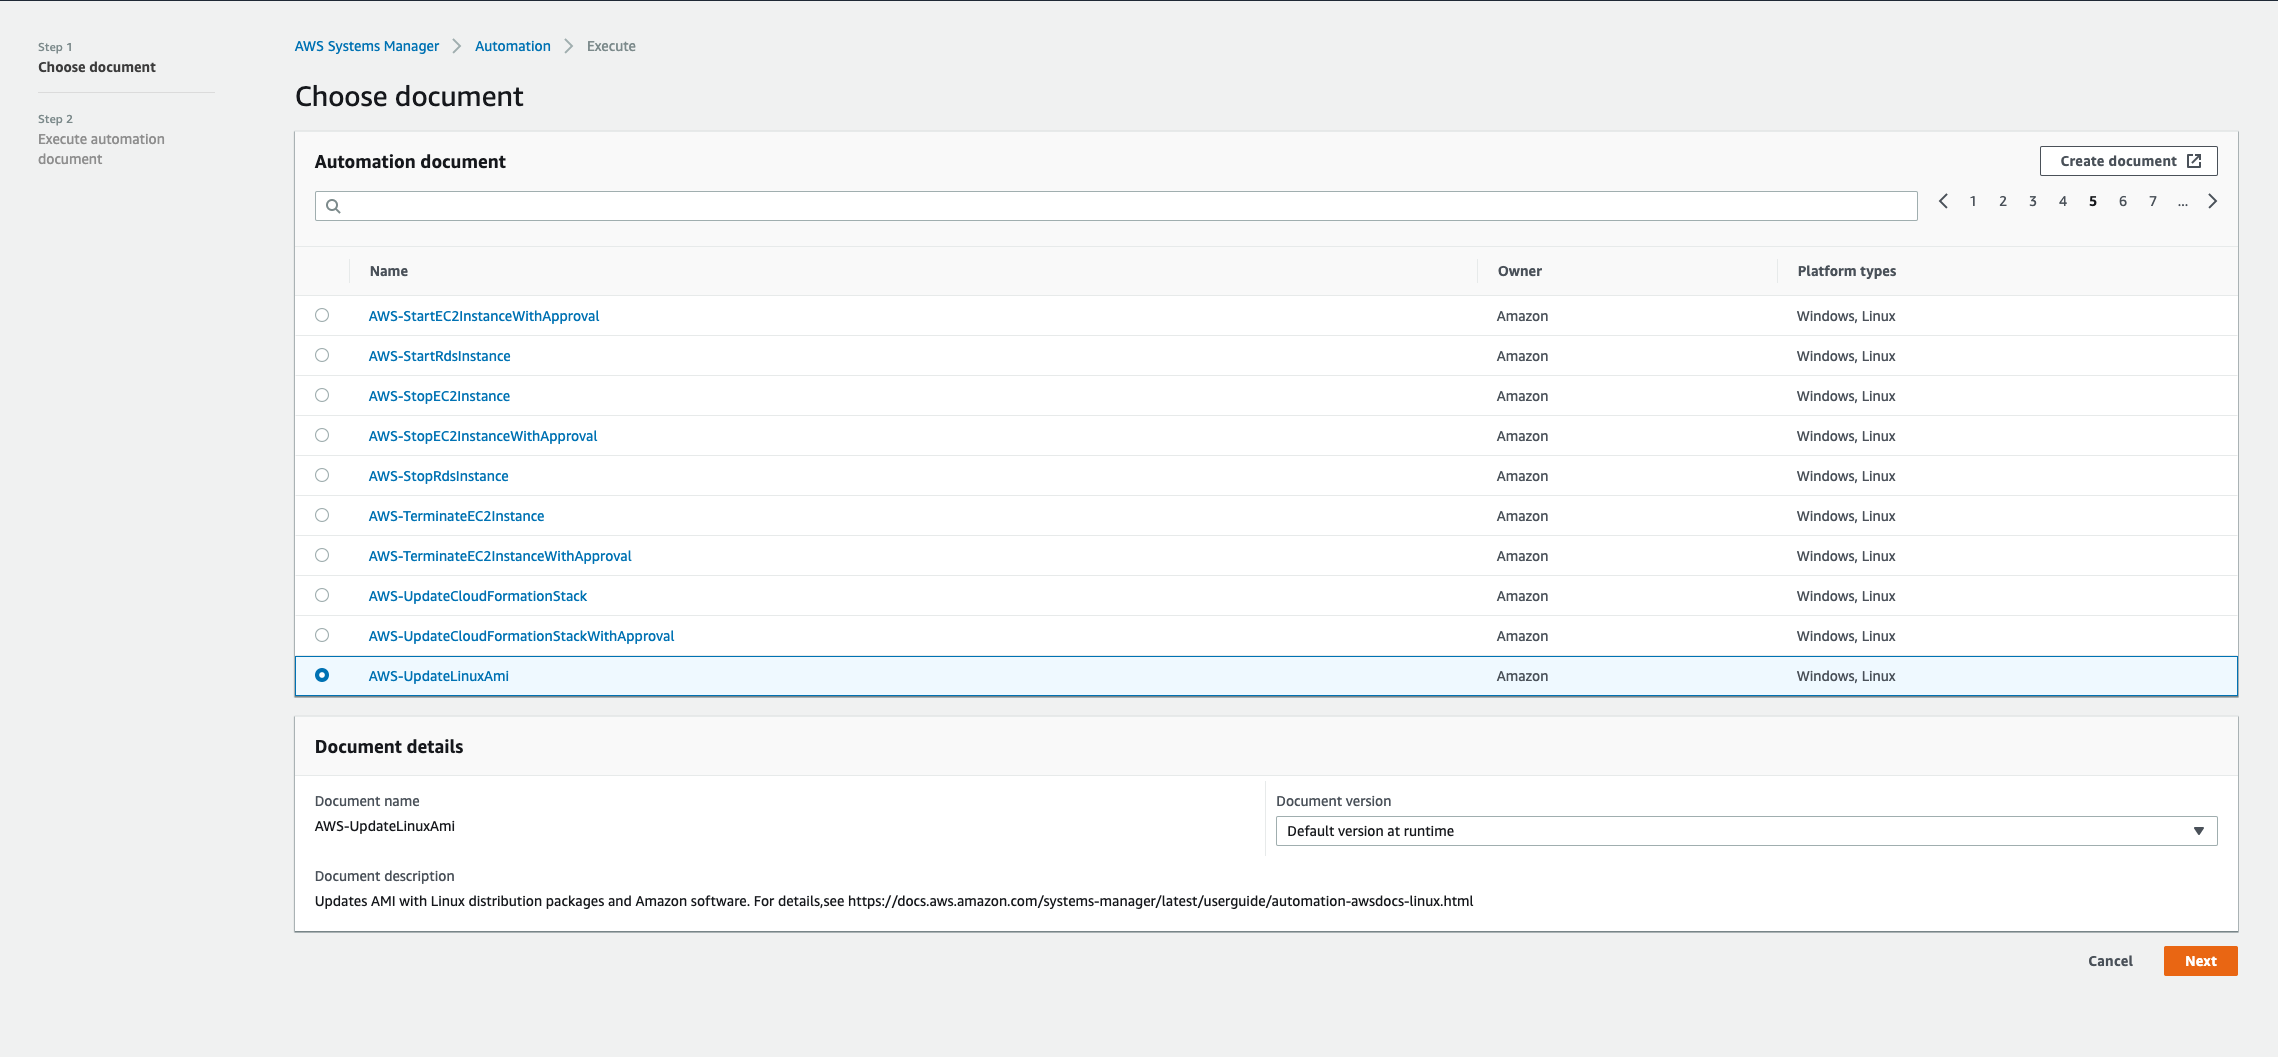
- Click on `Next` on bottom right
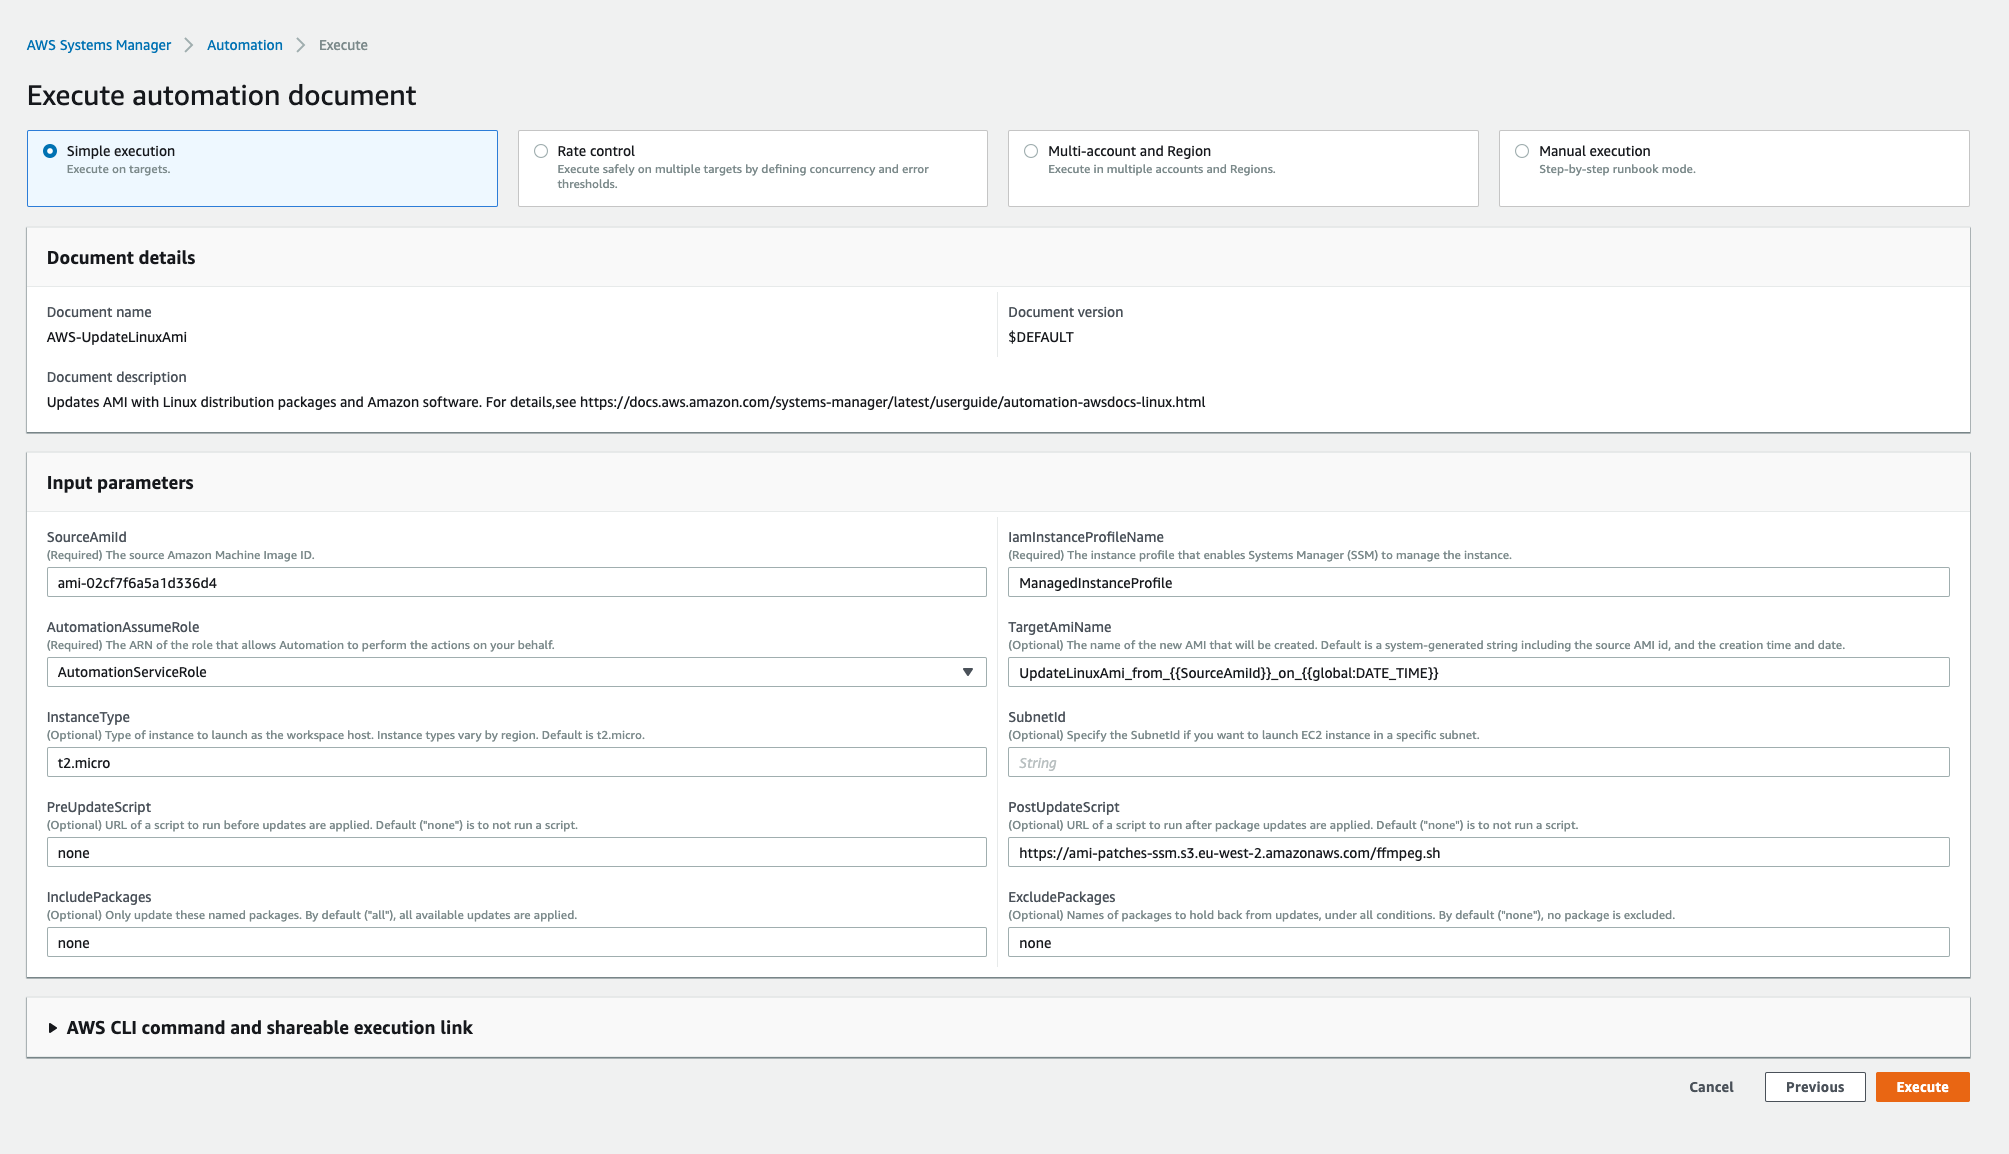
- Add `SourceAmiId` as the AMI you want to update
- Add `IamInstanceProfileName` with value `ManagedInstanceProfileForSSM`
- In `AutomationAssumeRole` select `AutomationServiceRole`
- Update `TargetAmiName` with one you want
- Select instance type based on memory and space you need for your command executions
- Keep `SubnetId` blank if you do not want to launch the temparary instance in a specific VPC subnet
- Keep `PreUpdateScript` to `none`
- Update `PostUpdateScript` with public s3 script url
- Keep `IncludePackages` and `ExcludePackages` to `none`
- And finally... Click on `Execute`
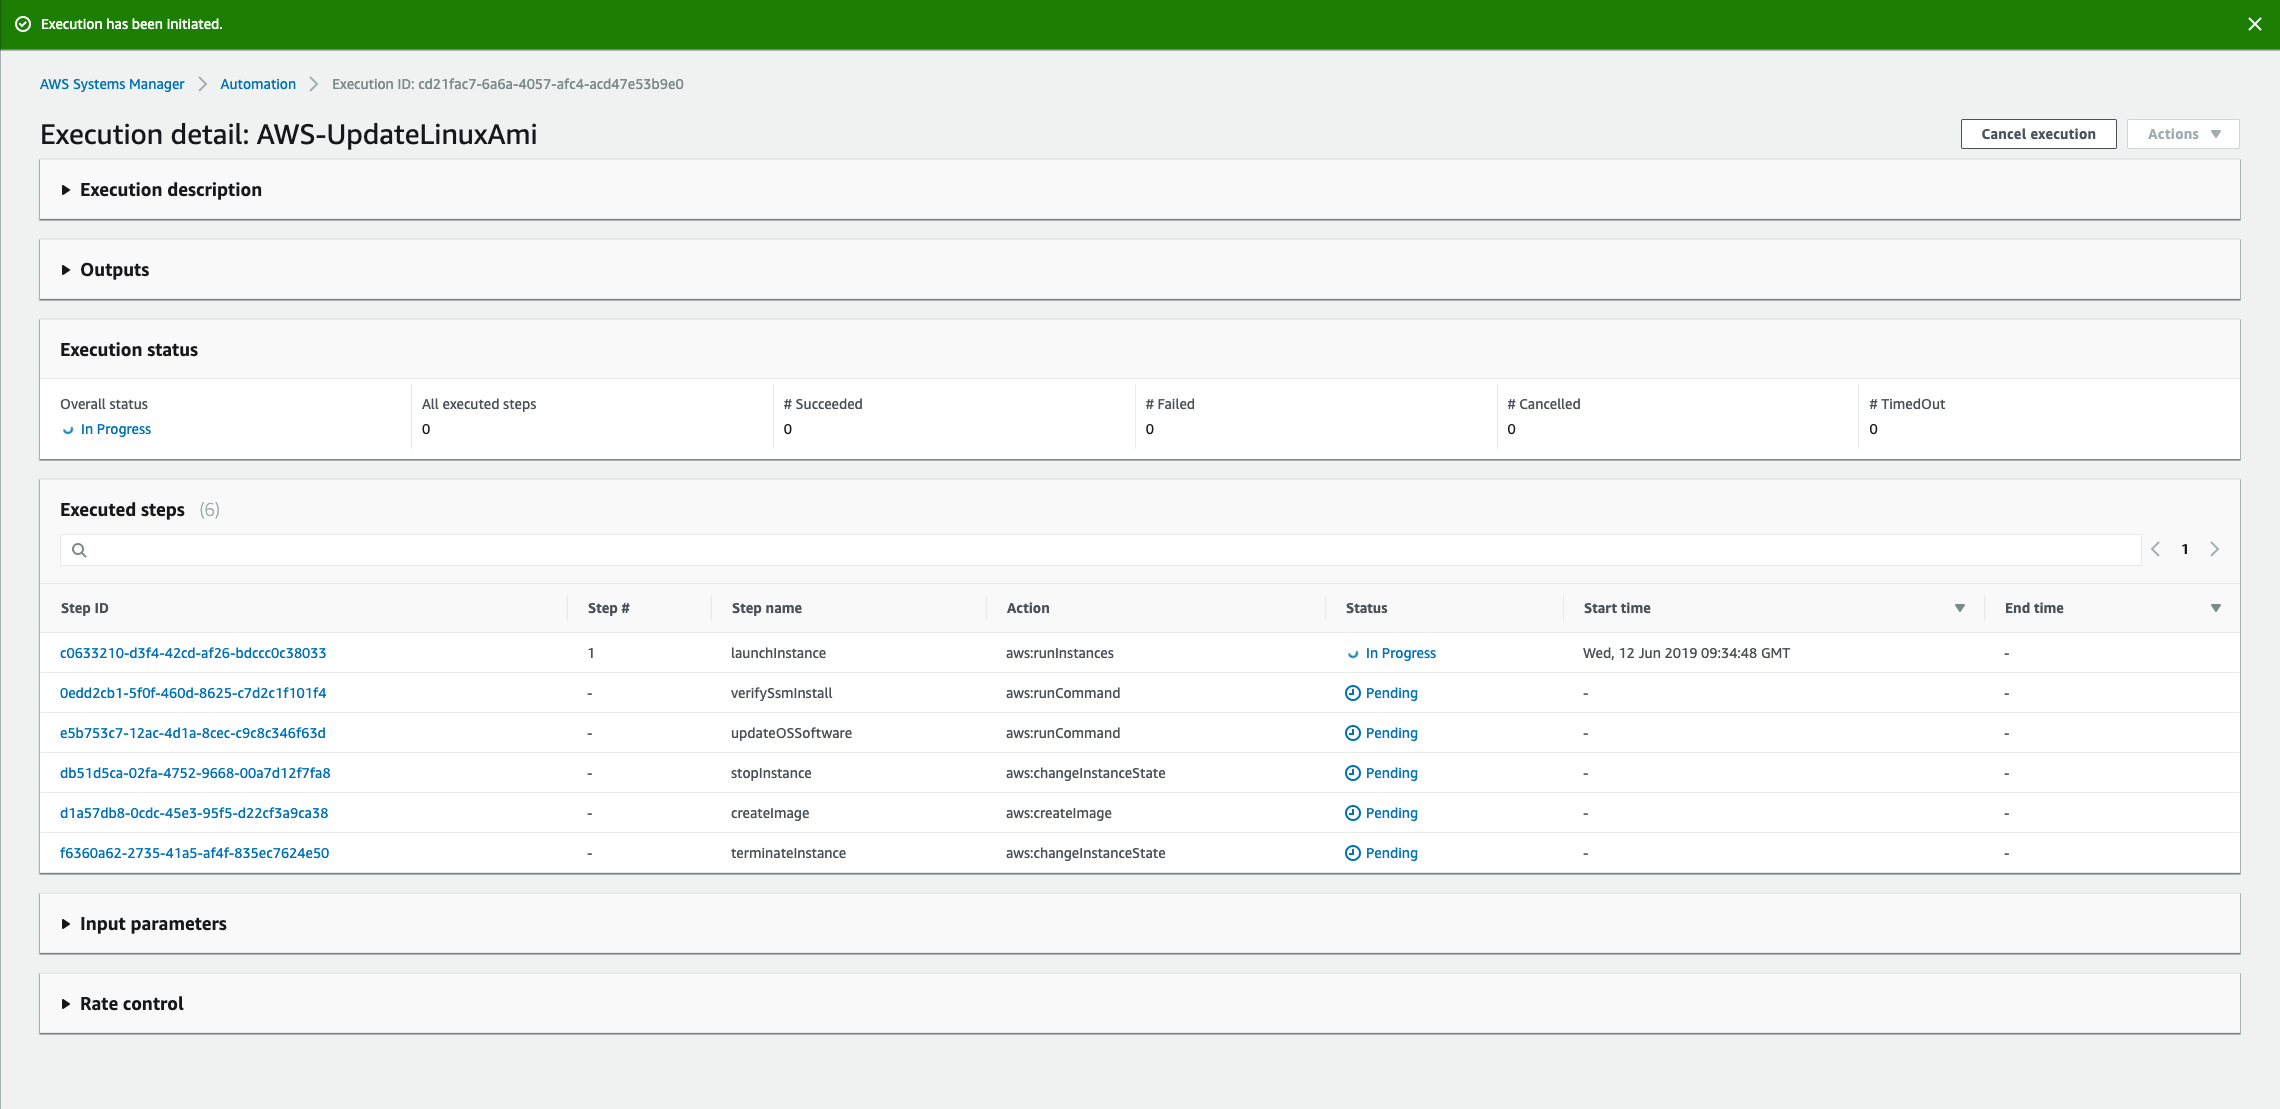
You will see progress of the automation with each step and it's details.
Some suggestions on best practices :
- If you have AWS instances setup in a custom VPC to comply with security regulations, make sure you select the VPC subnet ID so that the temparary instance will launch in that VPC. If not specified it launches instance in Default VPC
- The script of commands you put in s3 should not contain any sensitive information. Instead, store it in AWS System manager parameter store. You need to make sure your EC2 instance profile has policy to access the parameter store.
- Know what your commands do to guess how much memory and space and set the instance type accordingly while configuration automation execution.
- Once you are comfortable with above basic setup, go ahead and study the execution document json. You can do lot of customization and actions like what happens if a step fails etc.
Why so much pain :
You might be thinking why go through so much pain of setup when manually you can do it in 15-20 minutes? Don't worry as it's a one time setup time. Next time all you need to do it update the AMI script in s3 and run the execution. Grab your coffee and relax when AWS creates a new update AMI version for you!